The Workflow Automation dashboard provides a central location to view, manage, and monitor all workflows in your account. Use the dashboard to edit configurations, track version history, manage execution schedules, and troubleshoot failures. To manage workflows, you need at least one workflow in your account and edit and delete permissions.
Important
Disabling Workflow Automation? If you plan to turn off Workflow Automation through Feature Control Management (FCM), ensure all scheduled workflows are removed first. See Disabling Workflow Automation for detailed steps.
New to workflows? Start with Use a template or Create your own workflow to build your first workflow.
View workflows
Go to All Capabilities > Workflow Automation. If your account has no workflows, the dashboard displays an empty state with options to create your first workflow.
Dashboard tabs
Once you create workflows, the dashboard displays two tabs:
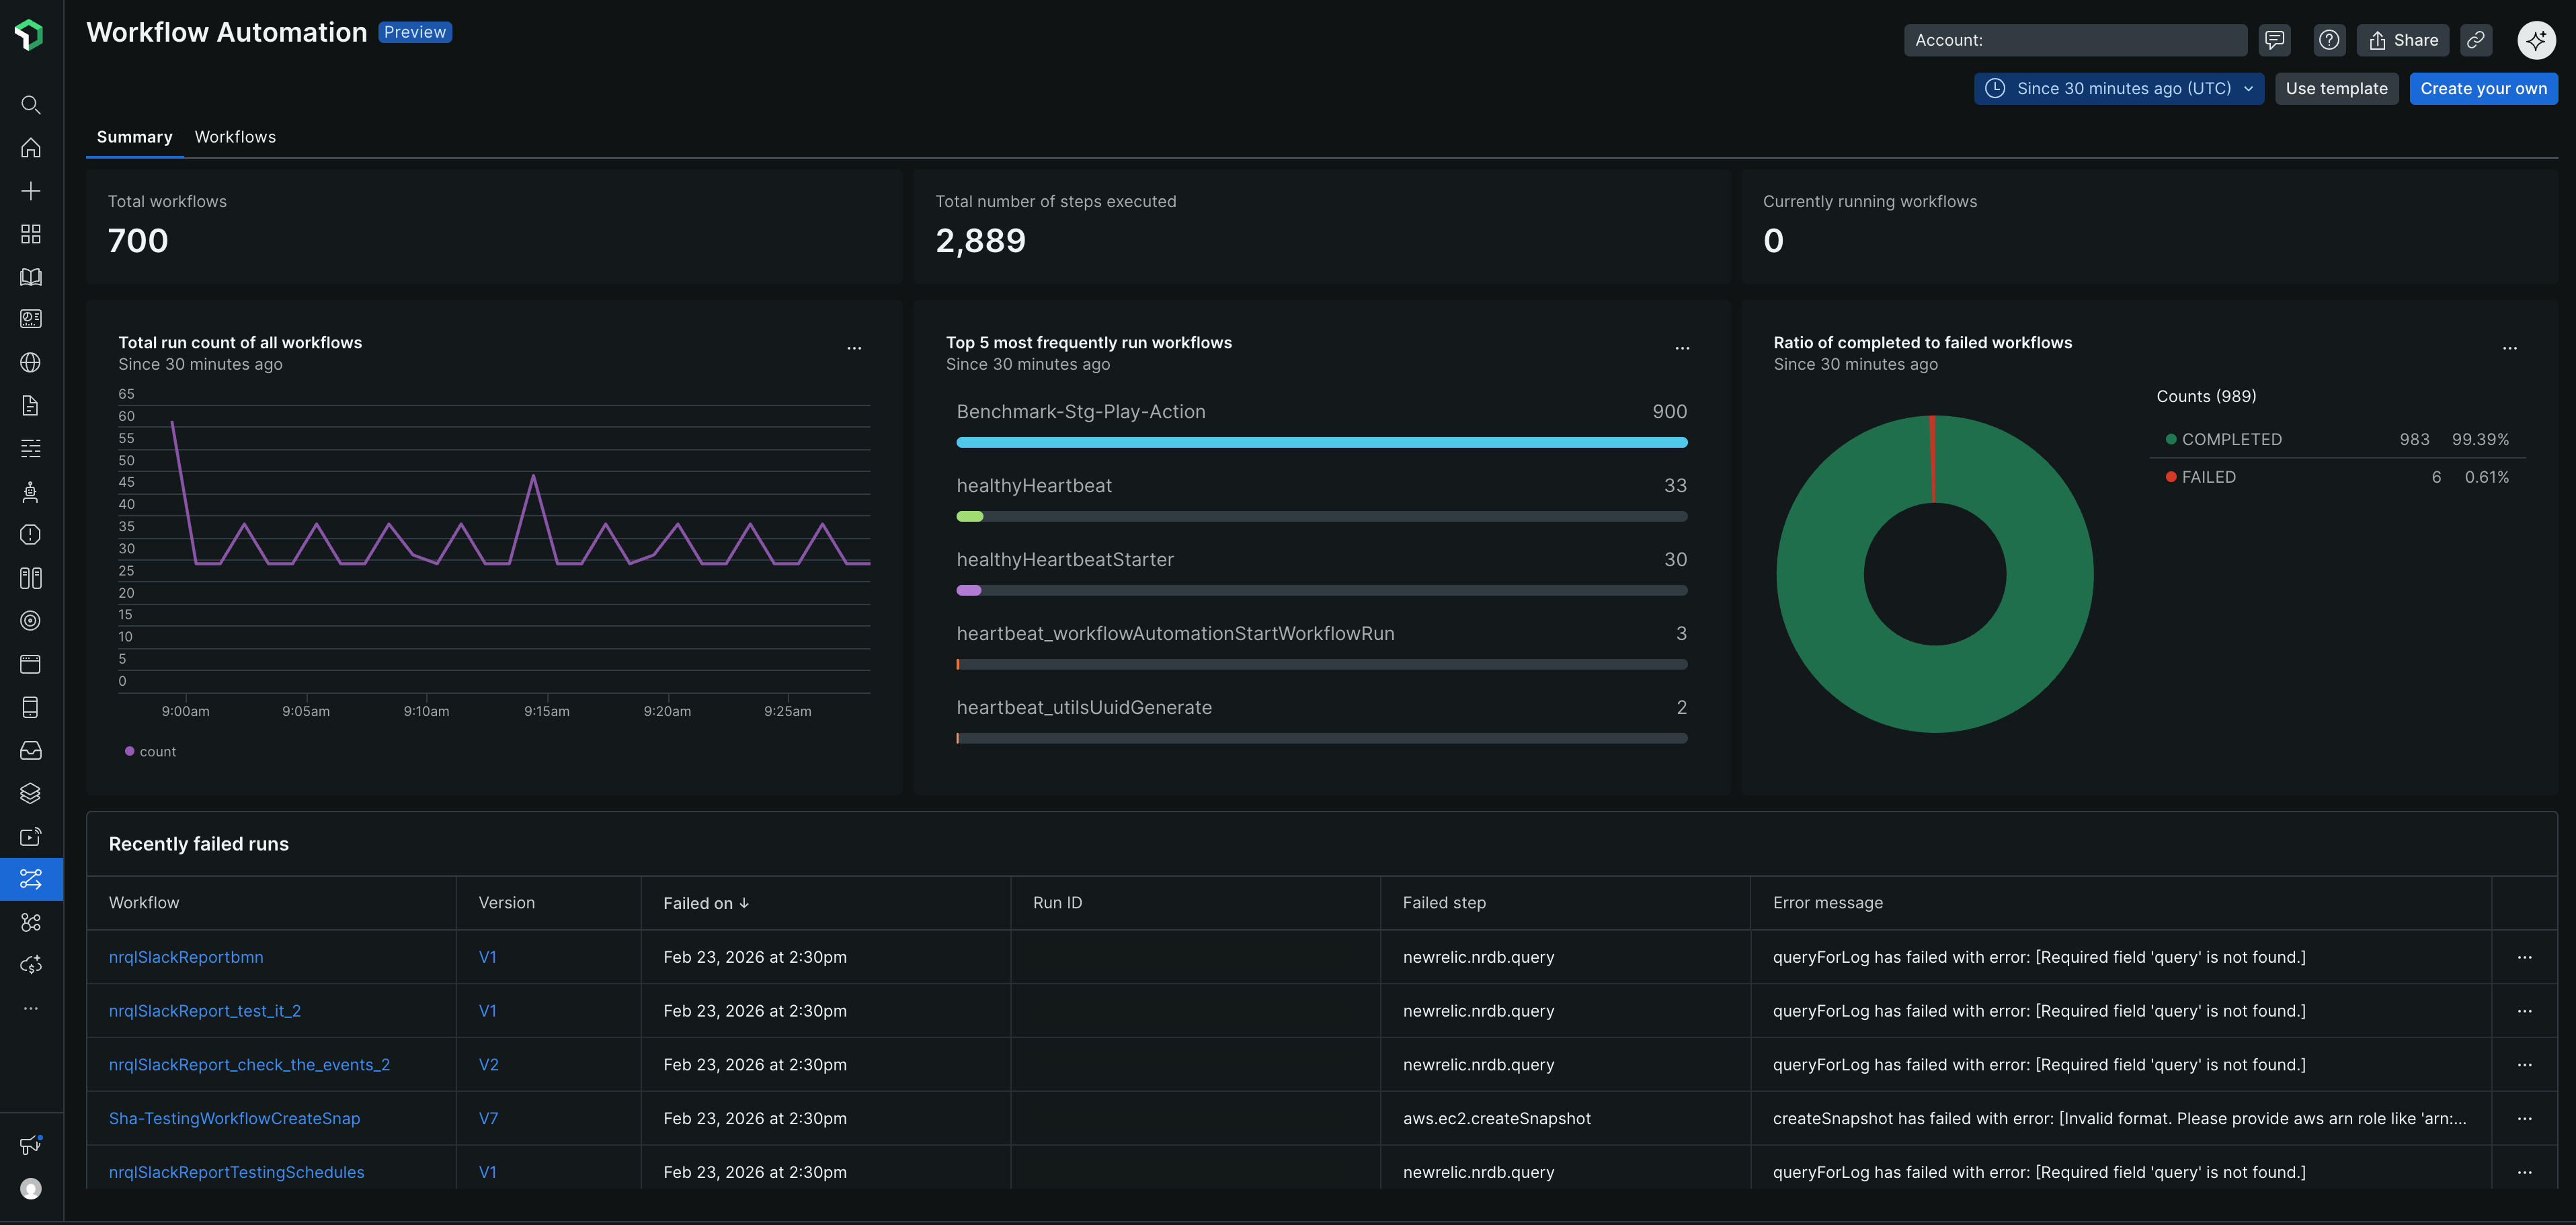
Summary tab (default): Displays account-level metrics and visualizations:
Top metrics:
- Total workflows: Count of all workflows in your account
- Total number of steps executed: Cumulative step count across all workflow runs
- Currently running workflows: Number of active executions
Performance charts:
- Total run count of all workflows: Line chart showing workflow execution trends over time
- Top 5 most frequently run workflows: Bar chart displaying the workflows with the highest execution counts
- Ratio of completed to failed workflows: Pie chart showing success vs. failure percentages and counts
Recently failed runs table: Displays failed workflow executions with these columns:
- Workflow: Name of the failed workflow
- Version: Workflow version that failed
- Failed on: Timestamp of the failure
- Run ID: Unique identifier for the failed run
- Failed step: Step where the failure occurred
- Error message: Description of the error
Each chart widget includes a context menu (three dots) to view query, get image, or create alert condition.
Workflows tab:
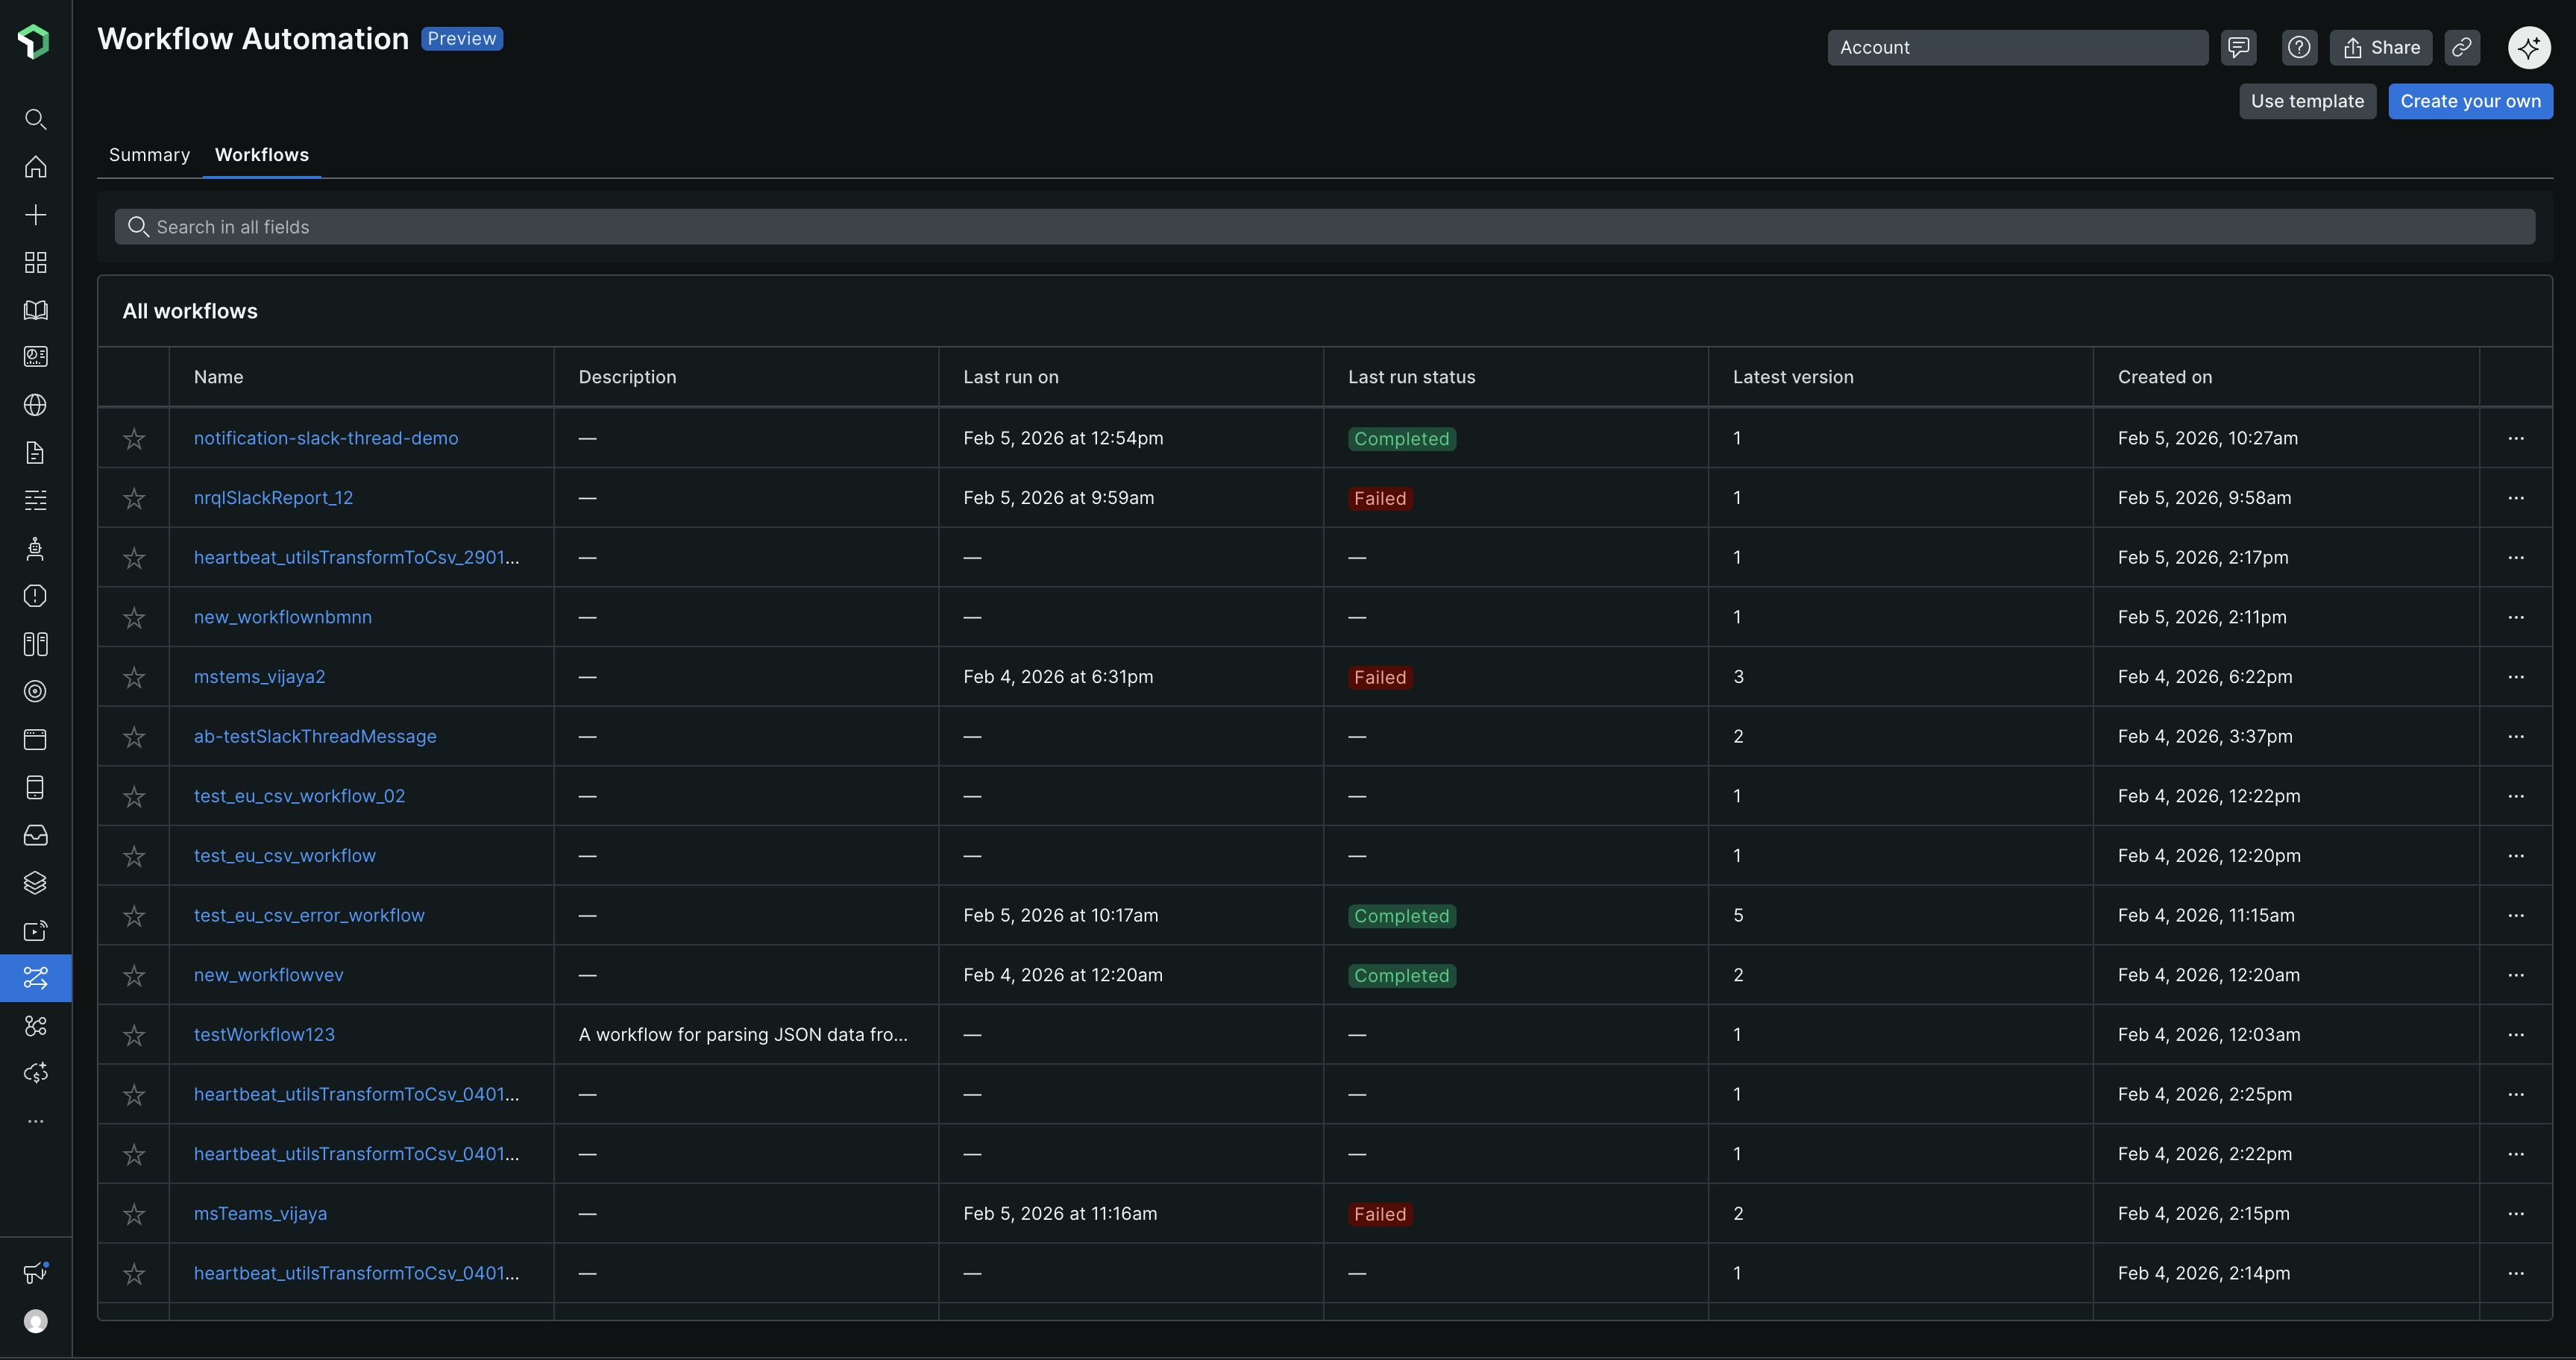
Search: Use the Search in all fields bar to find workflows by any column value.
All workflows table displays these columns:
- Favorite (star icon): Mark workflows as favorites
- Name: Workflow identifier
- Description: Purpose or function of the workflow
- Last run on: Timestamp of most recent execution
- Last run status: Execution result (displayed as colored badges: green for Completed, red for Failed)
- Latest version: Current version number
- Created on: Date when workflow was created
- Actions menu (three dots): Access workflow operations
Empty values in the table display as —
Row actions menu (click three dots next to workflow):
- Run: Execute the workflow immediately
- Schedule: Create a scheduled run
- Open in editor: Modify workflow configuration
- Duplicate: Create a copy of the workflow
- Delete: Remove the workflow permanently
Click a workflow name to view its Entity Overview page with detailed metrics, run history, schedules, and logs.
Edit a workflow
Update workflow name, description, or configuration.
- Locate the workflow you want to edit
- Click the ellipsis (three vertical dots) next to the workflow name
- Select Open in editor
- Update any of these:
- Name — The workflow identifier
- Description — Workflow purpose or function
- Configuration — Input parameters, actions, or logic
- Click Save
You can also access the editor from the Entity Overview page by clicking the Edit button.
Manage versions
Workflow automation automatically creates a new version every time you update a workflow definition. All previous versions remain available for reference and can be viewed or run directly from the editor.
View version history in the editor
You can browse all previous versions of a workflow without leaving the editor.
- Open a workflow in the editor
- Click the version dropdown in the editor toolbar
- Select any previous version from the list
The selected version opens in a read-only preview within the editor. You can review the configuration and run it, but you can't edit it directly.
Create a new version from a previous version
If you want to use a previous version as the basis for a new edit:
- Open the workflow in the editor and select a previous version from the version dropdown
- Click Edit as new version
- Make your changes
- Click Save
The system creates a new version numbered as the current highest version + 1. For example, if v5 is the latest and you edit v2, the result is v6. The previous version is not overwritten.
If you change your mind, click Cancel to discard the in-progress edit. No new version is saved, and you return to the workflow list.
Compare versions
A version comparison view is available in the editor. Use it to inspect differences between any two versions of a workflow before deciding which one to run or build from.
Version pinning for scheduling
When you schedule a workflow, you must pin it to a specific version. That pinned version runs even if you later update the workflow definition.
Start and schedule workflows support version pinning:
- When scheduling a workflow, specify which version to run
- When manually starting a workflow run, select which version to execute
- When you update a schedule, specify the new version to use
This allows you to:
- Update workflows without affecting running schedules
- Test new versions manually before updating schedules
- Maintain stability for production workflows
Duplicate a workflow
Duplicate workflows when you need to adapt a template or existing workflow for a different purpose while keeping the original intact.
- Locate the workflow you want to duplicate
- Click the ellipsis (three vertical dots)
- Select Duplicate
- The system creates a copy with (Copy) appended to the name
- Rename and customize the duplicated workflow for your needs
Common duplication scenarios:
- Adapting a workflow template for your specific use case
- Creating a workflow for a different team with similar requirements
- Experimenting with significant changes while preserving the original
Important
Don't duplicate workflows for version control — the system does this automatically. Duplicating workflows only for version control or rollback purposes can cause you to hit workflow limits. See Manage versions for information about automatic versioning.
Delete a workflow
Remove workflows you no longer need.
- Locate the workflow you want to delete
- Click the more options menu (three vertical dots)
- Select Delete
- Confirm the deletion in the dialog box
Prudence
Deleting a workflow is permanent. You can't undo it. We remove all versions and execution history. If you might need the workflow later, consider deactivating it instead of deleting it.
What gets deleted:
- All versions of the workflow
- All execution history and logs
- All scheduled runs associated with the workflow
Before deleting, verify:
- No critical automations depend on this workflow
- You have a backup copy if you might need it later
- Identify and account for all scheduled runs